" height="26.80529977783203px" id="tymKb8bqC" width="128.00300311279295px"/><path d="M 0 2.417 L 0 0 L 12.909 0 L 12.909 2.417 Z" fill="rgb(126, 78, 253)" height="2.417099999999998px" id="aYr4em6zK" transform="translate(128.341 22.325)" width="12.908999999999992px"/></svg>)
"/><stop offset="1" stop-color="rgb(118, 37, 250)"/></linearGradient></defs><g d="M 19.242 21.22 L 19.362 6.204 L 19.272 6.204 L 13.757 21.22 L 10.161 21.22 L 4.796 6.204 L 4.706 6.204 L 4.825 21.22 L 0 21.22 L 0 0 L 7.283 0 L 12.109 13.607 L 12.229 13.607 L 16.844 0 L 24.247 0 L 24.247 21.22 Z M 26.421 26.113 L 26.421 23.445 L 41.407 23.445 L 41.407 26.113 Z" fill="transparent" height="26.112508199679183px" id="DvfaAIHYn" width="41.40731898311435px"><path d="M 19.242 21.22 L 19.362 6.204 L 19.272 6.204 L 13.757 21.22 L 10.161 21.22 L 4.796 6.204 L 4.706 6.204 L 4.825 21.22 L 0 21.22 L 0 0 L 7.283 0 L 12.109 13.607 L 12.229 13.607 L 16.844 0 L 24.247 0 L 24.247 21.22 Z" fill="rgb(46, 46, 46)" height="21.220180016149442px" id="pLsxRCobd" width="24.247352589074694px"/><path d="M 0 2.668 L 0 0 L 14.986 0 L 14.986 2.668 Z" fill="url(%23yD9d4I5GR-3279285344-linear-gradient)" height="2.6675085048549647px" id="yD9d4I5GR" transform="translate(26.421 23.445)" width="14.986002836263765px"/></g></svg>)

Diane Massé
Product Specialist
How to schedule a post?
Scheduling your LinkedIn posts with MagicPost is the ultimate time-saver. No more last-minute rush to write something engaging—plan ahead, optimize your posting times, and let MagicPost do the heavy lifting for you.
In this guide, we’ll walk you through how to schedule a post step by step, plus some best practices to maximize engagement.
Why schedule your LinkedIn posts?
If you’re serious about growing your LinkedIn presence, consistency is key. But let’s be real—you don’t always have time to post manually every day. That’s where scheduling comes in:
✔️ Stay consistent without thinking about it every morning.
✔️ Post at the best times for your audience.
✔️ Batch your content creation so you can focus on other things.
✔️ Maintain a strategic content plan instead of posting on a whim.
Step 1: Create your post
First things first—head over to the Editor or Generator in MagicPost.
Write your post (or let the AI help you generate ideas).
Fine-tune your copy, add hooks, emojis, or formatting.
Upload images, carousels, or videos if needed.
💡 Pro tip: Check your past performance in the Metrics section to see which types of posts worked best!
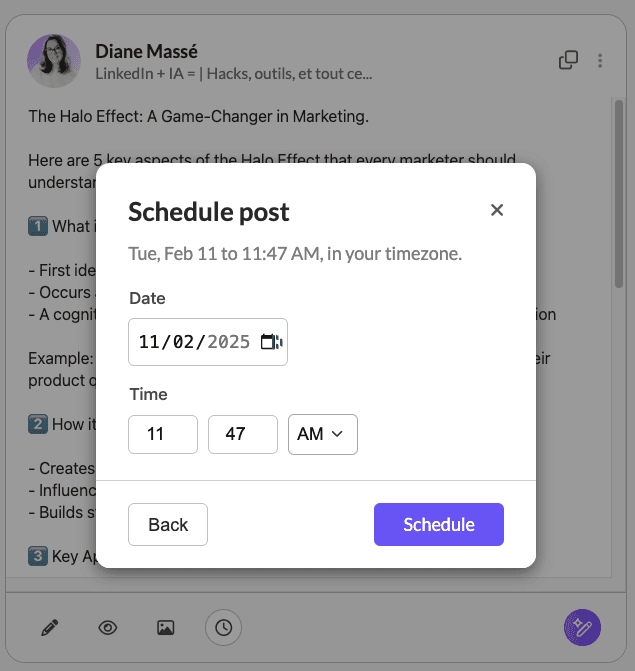
Step 2: Choose your posting time
Once your post is ready, it’s time to schedule it:
Click on the "Schedule" button instead of "Post Now".
Select the date and time you want your post to go live.
Confirm your timezone (it’s automatically set based on your account settings, but you can change it if needed).
Need help picking the right time?
MagicPost’s Metrics feature can show you when your audience is most active—helping you post when engagement is highest!
Step 3: Review & Confirm
Before you hit confirm, double-check:
✔️ Spelling and formatting—Does everything look good?
✔️ Hashtags & mentions—Are they correct?
✔️ Time & date—Are you posting at the best moment?
If everything looks perfect, hit “Schedule”, and MagicPost will take care of the rest!
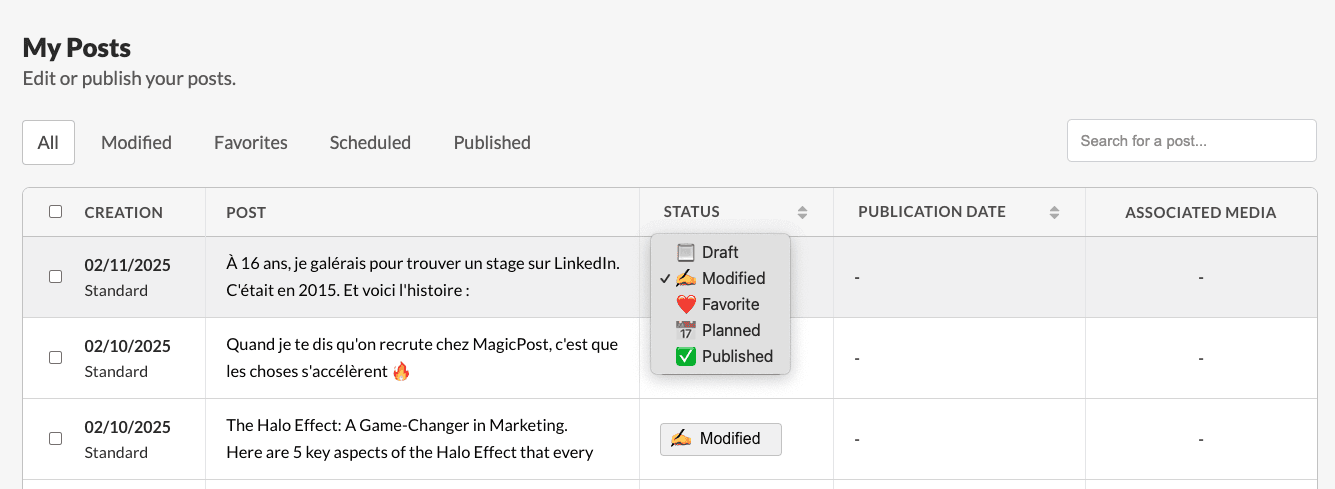
Step 4: Manage your scheduled posts
Need to make a last-minute change? No problem!
Go to the “My Posts” section.
Find your scheduled post.
Edit, reschedule, or delete if necessary.
MagicPost gives you full control over your content, even after scheduling.
You can edit and delete any published LinkedIn post directly from MagicPost. No need to go to LinkedIn. Just open the published post, click on "Edit" then make your changes.
Bonus: Best practices for scheduling success
✔️ Post when your audience is online – Use MagicPost’s data insights!
✔️ Keep a balance – Mix different content types (text, images, carousels).
✔️ Engage after posting – Scheduling is great, but replying to comments boosts visibility!
✔️ Test & optimize – Track your results in the Metrics section to refine your strategy.
With MagicPost, scheduling your LinkedIn posts is effortless, strategic, and efficient.
Still have questions? Check out our support page or reach out to our team—we’re here to help!
Last update on: